In the fast-paced world of technology, adaptability and evolution are paramount for success. Today, we bring you the incredible journey of iRobot in creating smart homes, powered by the scalable and reliable infrastructure of Amazon Web Services (AWS).
iRobot: Pioneers in Home Robotics
Since the launch of Roomba in 2002, iRobot has been synonymous with innovation in the home. With over 20 million robots sold worldwide, they have revolutionized how we approach household cleaning. But their vision extends further: they aspire to create homes that not only clean themselves but also are intelligent and autonomous.
The Connectivity Challenge: A New Chapter for iRobot
The success of Prime Day 2015, with 14,000 Roombas sold in a single day, marked a milestone for iRobot. However, this success also presented a challenge: the demand for connected robots was growing exponentially, challenging the capacity of their mobile application, iRobot HOME, to handle massive user traffic.
Prioritizing the Customer with AWS
By migrating their platform to the AWS cloud, iRobot was able to offer scalability, global availability, and a wide range of services, all while maintaining a customer-centric approach. AWS became the perfect ally to tackle the challenges of connectivity and scalability, allowing iRobot to focus on its core value proposition: providing cutting-edge products that simplify the lives of its customers.
Benefits of the Collaboration
Efficient management with fewer than 10 employees, thanks to AWS’s robust infrastructure.
Facilitation of the evolution towards smart homes, providing iRobot with the necessary foundation to explore new frontiers in home automation.
Successful transition from a hardware provider to a cloud-based company, thanks to the flexibility and reliability of AWS.
The Future of Smart Homes: AWS Leading the Way
The partnership between iRobot and AWS is just the beginning of a revolution in smart homes. By leveraging AWS’s serverless architecture, IoT services, and real-time data analysis, iRobot is paving the way for homes that not only clean themselves but also anticipate our needs and act accordingly.
AWS Driving Transformations
The collaboration between iRobot and AWS is a testament to the transformative power of technology in everyday life. As a leading cloud services provider, AWS continues to be a catalyst for innovation and progress across a wide range of industries, from home robotics to artificial intelligence and beyond.
Digital transformation has become a crucial imperative for companies aiming to stand out in an ever-changing market. In this context, Amazon Web Services (AWS) emerges as a strategic ally, offering a wide array of cloud services that span from development to cutting-edge technologies.
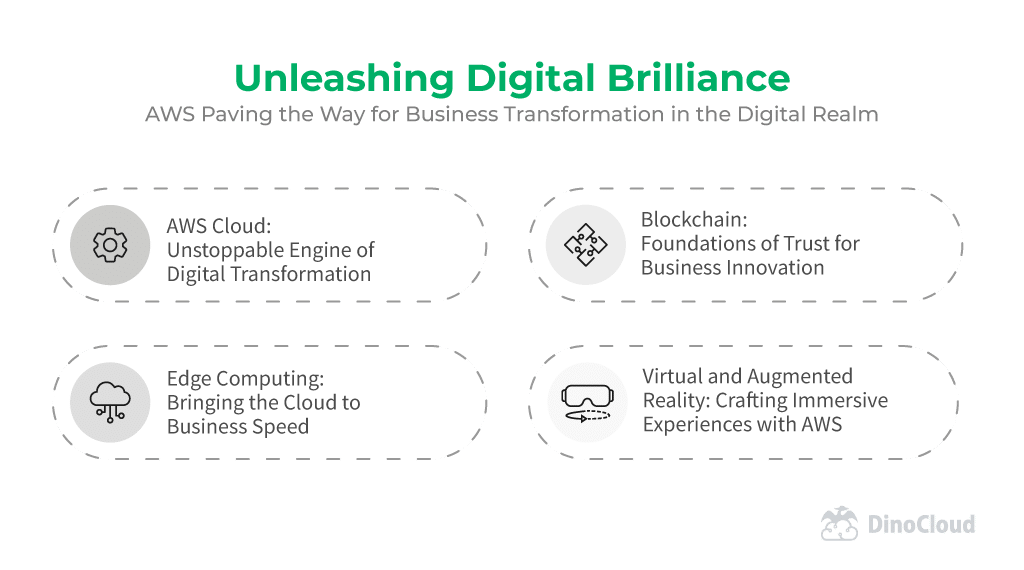
AWS Cloud: Unstoppable Engine of Digital Transformation
As a global leader in cloud computing services, AWS stands out for providing over 200 services tailored to meet the demands of businesses. The flexibility, scalability, security, and cost-effectiveness of the platform enable companies to host applications and data without significant investments in physical infrastructure. This flexibility translates into the ability to adopt an agile and DevOps approach, whether migrating, modernizing, or optimizing existing applications, or creating new ones native to the cloud.
Edge Computing: Bringing the Cloud to Business Speed
The capability to extend the cloud to the edge of the network with AWS makes a significant difference in user experience. By reducing latency and costs, edge computing enhances efficiency and reinforces security by processing data closer to its source. AWS offers a variety of services such as AWS Lambda@Edge, AWS IoT Greengrass, AWS Wavelength, AWS Snow Family, and AWS Outposts, enabling the deployment and management of applications at the edge efficiently and consistently.
Blockchain: Foundations of Trust for Business Innovation
In the journey towards transformation, AWS facilitates the creation and adoption of blockchain networks. These distributed systems securely and immutably record transactions, boosting efficiency and trust. With options like Amazon Managed Blockchain, Ethereum, Hyperledger Fabric, and Corda, companies can integrate blockchain networks with their applications and data in the cloud to foster innovation and transparency.
Virtual and Augmented Reality: Crafting Immersive Experiences with AWS
Virtual and augmented reality are within reach thanks to AWS, providing tools and services for the creation and delivery of immersive experiences. Services such as Amazon Sumerian, Amazon Lex, Amazon Polly, Amazon Rekognition, Amazon Lumberyard, and AWS RoboMaker allow companies to easily develop and host immersive content in the cloud, distributing it to various devices.
In summary, AWS stands as a fundamental strategic partner in the digital transformation journey. From cloud flexibility to the power of edge computing, blockchain, and immersive experiences, AWS provides the necessary tools to innovate, differentiate, and thrive in today’s market. By adopting these solutions, companies are poised to unlock their digital potential and confidently face the challenges of tomorrow. Transformation is within reach, and AWS is the partner guiding you towards the future.
A few years ago, development and operations teams had to deal with different technologies repeatedly to move a project forward. In this technological maze, a quiet hero emerged, Platform Engineering, which unified how software engineers deliver value to our customers and paved the way for a more innovative, secure, and efficient future.
In an increasingly interconnected and digital world, we were confident that technology was advancing by leaps and bounds. However, a challenge arose with the rapid growth of applications and LOS services: maintaining the stability, scalability, and efficiency of technology platforms. In response to this challenge, the concept of Platform Engineering emerged, a discipline that became fundamental to building and maintaining the foundations upon which technological innovations rest.
Although this discipline arrived to solve these problems, its development and consolidation implied a winding road, and from its beginnings to the present, it went through several stages.
Unstable foundations
In the early days of the digital revolution, each development team created its environment, and the operations team managed the infrastructure. While this worked for a while, the advent of cloud technologies, Docker, and microservices highlighted the problems with this methodology. Knowledge silos were stressed, and value delivery to the customer grew slower.
The rise of DevOps and the push of Lean Startup ideas helped change the concept of silos to more interconnected teams, which sought to break this outdated mindset within organizations.
Beyond the improvement that this new approach represented, as the complexity of the applications increased, the time, resources, and costs required to maintain them skyrocketed, threatening to sink the business.
In search for efficiency
Amid the technological chaos, some visionaries began to think of a solution to this problem. They recognized the need for a common, reusable, and standardized architecture that could provide a solid foundation for all applications. There, the concept of Platform Engineering came to be, aiming to unify infrastructures and tools to optimize software development and deployment. Along with the Platform Engineering concept, the “platform,” “tooling,” or “foundation” team emerged to take on this epic challenge.
The Technological Web
This new team immersed itself in the creation of a robust platform. They immediately noticed that, to achieve high scalability, applying the concept of “you build it, you run it” was mandatory. Still, it implied a great job of abstracting all the areas involved in modern software delivery (security, observability, DevOps, monitoring, Cloud, etc.).
This problem could be explained by quoting Kelsey Hightower: “If they don’t require you to be an airline pilot when you take a flight, why require a developer to know Kubernetes, AWS, docker, etc. in detail?” With this in mind, they designed a technological spider’s web ranging from resource management to process automation. They integrated monitoring tools to gain visibility and ensure optimal performance, always focused on security end-to-end and quality as a standard.
After battling day and night with these problems, a product for internal use was born to solve these problems: Internal Developer Platform (IPD). This internal product seeks a self-service of tech services to accelerate software delivery to customers, among other things.
Revolution in the technological ecosystem
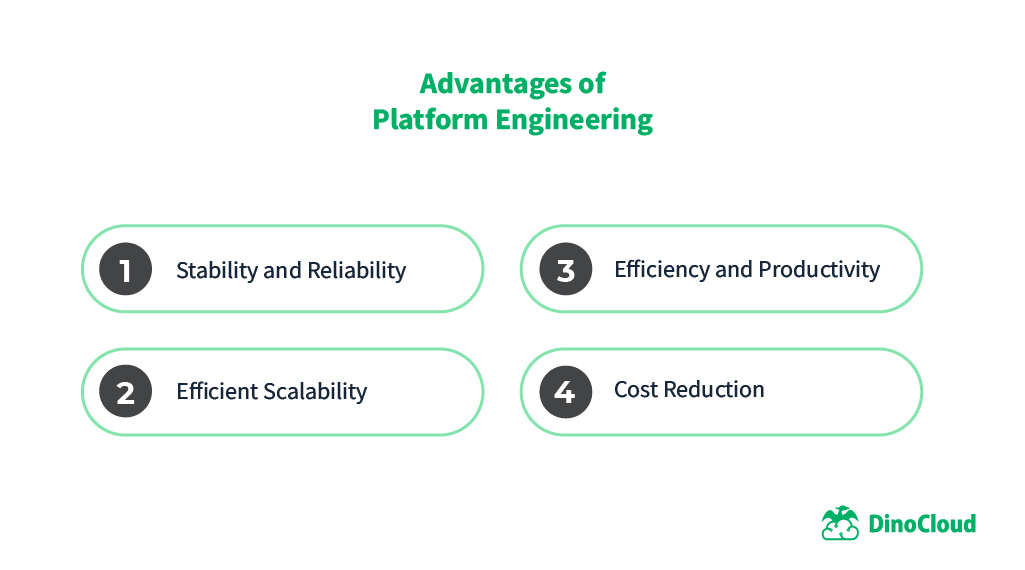
The magic of Platform Engineering began to pay off. The advantages became evident:
Stability and Reliability: The centralized platform allowed tighter control over the components, reducing errors and increasing system reliability.
Efficient Scalability: The modular and scalable architecture allowed for growth on demand without sacrificing performance.
Efficiency and Productivity: The standardization of processes and tools accelerated the development and deployment of applications, freeing up time for innovation.
Cost Reduction: The reuse of components and the optimization of resources reduced operating and infrastructure costs.
The Legacy
Over time, Platform Engineering became the mainstay of modern technological operations. His legacy lives on in the industry, driving digital transformation and enabling companies to meet future challenges with a solid foundation.
Thus concludes the story of the birth of Platform Engineering. I hope it sheds some light on a concept often kept in the dark. Thanks to its focus on efficiency, scalability, and stability, companies can successfully meet the challenges of the digital era, driving innovation and delivering increasingly outstanding solutions to their users in record time.
Further bibliography
If you want to learn more, I recommend you to refer to these sources that I took as a reference:
11 best practices to get your production cluster working from the get-go
Containers have become the norm for the creation of cloud-native applications, and Kubernetes, commonly referred to as K8s, is undoubtedly the most well-liked container orchestration technology.
Popularity and usability are not the same things, though, as the Kubernetes system is a complicated one; it requires a steep learning curve to get started. While some of the following Kubernetes best practices and suggestions may not be appropriate for your environment, those that are can help you utilize Kubernetes more effectively and quickly.
This post will delve into 11 Kubernetes best practices to get the most out of your production cluster.
We’re kicking things off with a friendly reminder: keep your Kubernetes version updated. Apart from introducing new features and functionalities, new releases come with fixes and patches to relieve vulnerability and security issues in your production cluster, and we think this is one of the most salient advantages of keeping your K8s up-to-date.
However, the production team should study and test thoroughly all the new features before updating, as well as those features or functionalities that were depreciated to avoid losing compatibility with the applications running on the cluster. Updating the version without analyzing it and testing it in a secure environment could hinder production times.
Create a firewall
This best practice may not come as a surprise to you, as having a firewall in front of your Kubernetes cluster seems common ground, but there are a lot of developers that do not pay attention to this.
So here’s another friendly reminder: create a firewall for your API server. A firewall will ward off your K8s environment to prevent attackers from sending connection requests to your API server from the Internet. IP addresses should be whitelisted and open ports restricted by using port firewalling rules.
Use GitOps workflow
A Git-based workflow is the go-to method for a successful Kubernetes deployment. This workflow sparks automation by using CI/CD pipelines, improving productivity by escalating application deployment efficiency and speed.
Bare in mind, however, that the git must be the single source for all automation which will unify the management of the whole production cluster. Another option is to choose a dedicated infrastructure delivery platform, like Argo CD, a declarative, GitOps continuous delivery tool for Kubernetes.
Are you stuck in Git-Ops? We can help you with that
Audit your logs regularly to identify vulnerabilities or threats in your cluster. Also, it is essential to maintain a centralized logging layer for your containers.
Besides, auditing your logs will tell you how many resources you are consuming per task in the control plane and will capture key event heartbeats. It’s crucial to keep an eye on the K8s control plane’s components to limit resource use. The control plane is the heart of K8s; it depends on these parts to maintain the system’s functionality and ensure proper K8s operations. The control plane comprises the Kubernetes API, kubelet, etcd, controller-manager, kube-proxy, and kube-dns.
Make use of namespaces
Kubernetes comes with three namespaces by default: default, kube-public, and kube-system. Namespaces are critical for structuring your Kubernetes cluster and keeping it secure from other teams operating on the same cluster. You need distinct namespaces for each team if your Kubernetes cluster is vast (hundreds of nodes) and many teams or apps are working on it. Sometimes, different environments are created and designated to each team for cost-optimization purposes.
You should, for instance, designate various namespaces for the development, testing, and production teams. By doing this, the developer who only has access to the development namespace will be unable to update anything in the production namespace accidentally. There is a likelihood of unintentional overwrites by teammates with the best of intentions if you do not perform this separation.
Resource requests and limits
Resource limits define the maximum resources used by a container, whereas resource requests define the minimum. Pods in a cluster can utilize more resources than necessary if there are no resource requests or restrictions.
The scheduler might be unable to arrange additional pods if the pod starts using more CPU or memory on the node and the node itself might even crash. It is customary to specify CPU in millicores for both requests and limitations. Developers use Megabytes or mebibytes to measure memory.
Use labels/tags
Multiple components, including services, pods, containers, networks, etc., make up a Kubernetes cluster. It is challenging to manage all these resources and track how they relate to one another in a cluster, so labels are helpful in this situation. Your cluster resources are organized using key-value pairs called labels in Kubernetes.
Let’s imagine, for illustration, that you are running two instances of the same kind of program. Despite having identical names, separate teams use each of the applications (e.g., development and testing). By creating a label that uses their team name to show ownership, you may assist your teams in differentiating between the comparable applications.
Role-Based Access Control
Your Kubernetes cluster is vulnerable to hacking, just like everything else. To get access, hackers frequently look for weaknesses in the system. So, maintaining the security of your Kubernetes cluster should be a top priority, and verifying that RBAC is at use in Kubernetes as a first step.
Each user in your cluster and each service account running in your cluster should have a role. Multiple permissions are contained in Role-Based Access Control roles that a user or service account may employ. Multiple users can have the same position, and each role can have various permissions.
Track network policies
Network policies serve to to limit traffic between objects in the K8s cluster. All containers have network communication capabilities by default, which poses a security concern if bad actors can access a container and use it to move between objects in the cluster.
Like security groups in cloud platforms limit access to resources, network policies can govern traffic at the IP and port levels. Typically, all traffic should be automatically denied, and rules should be implemented to permit necessary traffic.
Are your application security-sensitive areas being overwatched?
Readiness and liveness probes function like health exams. Before permitting routing the load to a specific pod, a readiness probe verifies the pod is active and operational. Requests withhold from your service if the pod isn’t available until the probe confirms the pod is up.
A liveness probe confirms the existence of the application: it pings the pod in an attempt to get a response before checking on its status. If nothing happens, the application isn’t active on the pod. If the check is unsuccessful, the liveness probe creates a new pod and runs the application on it.
Services meshes
You can add a dedicated infrastructure layer to your applications called service mesh. Without adding them to your code, it lets you transparently add features like observability, traffic management, and security. The phrase “service mesh” refers to the software you employ to carry out this pattern and the security or network domain that results from its application.
It can get more challenging to comprehend and manage distributed service deployment as it increases in size and complexity, such as in a Kubernetes-based system. Its requirements may include measurement, monitoring, load balancing, failure recovery, and discovery. Additionally, a service mesh frequently takes care of more complex operational needs like end-to-end authentication, rate restriction, access control, encryption, and canary deployments.
The ability to communicate between services is what enables distributed applications. As the number of services increases, routing communication within and between application clusters becomes more difficult.
These Kubernetes best practices are just a tiny sample of all those available to make Kubernetes a more straightforward and beneficial technology to use while developing applications. As we said in the introduction, Kubernetes requires a steep learning curve to get started.
Even with the ever-increasing number of tools and services to speed up the procedures involved, that can be overwhelming for development teams already swamped with the numerous duties required in modern application development. But if you start with these pointers, you’ll be well on your way to adopting Kubernetes to advance your complex application development initiatives.
In DinoCloud, we have an excellent team of engineers and architects with vast experience in Kubernetes environments. Let’s find out how we can help you overcome the difficulties in the development of your cloud application.
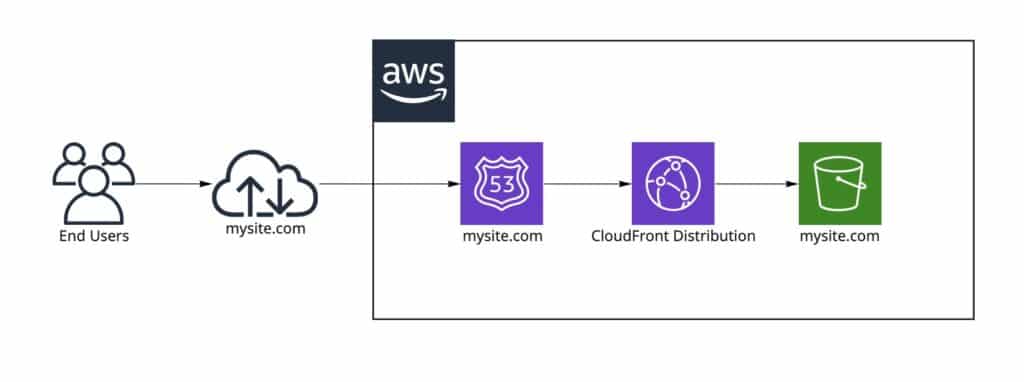
You can deploy an Amazon S3 bucket to work as a website with a CloudFront Distribution for Content Delivery and Route 53 for cloud Domain Name System (DNS)
Why choose a static website?
Hosting static websites is becoming more and more popular, but what does it mean to be static? It means that your site consists of a set of “pre-built” files (HTML, js, and CSS files) that are directly served on request. This plus the resources that AWS offers allows us to have a serverless, flexible, scalable, highly performing, secure and low-cost infrastructure.
Before you begin:
As you follow the steps in this example, you will work with the following services:
CloudFront: Distribution and Origin Access Identity.
Route 53: Hosted Zone and Records.
S3: Bucket.
You will need to have these prerequisites before starting the steps:
Route 53: Domain Name already registered.
Certificate Manager: Certificate requested (Optional in case you want to secure communication through the HTTPS protocol).
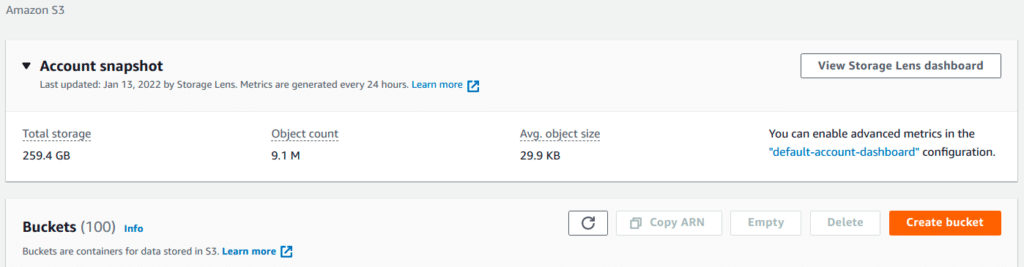
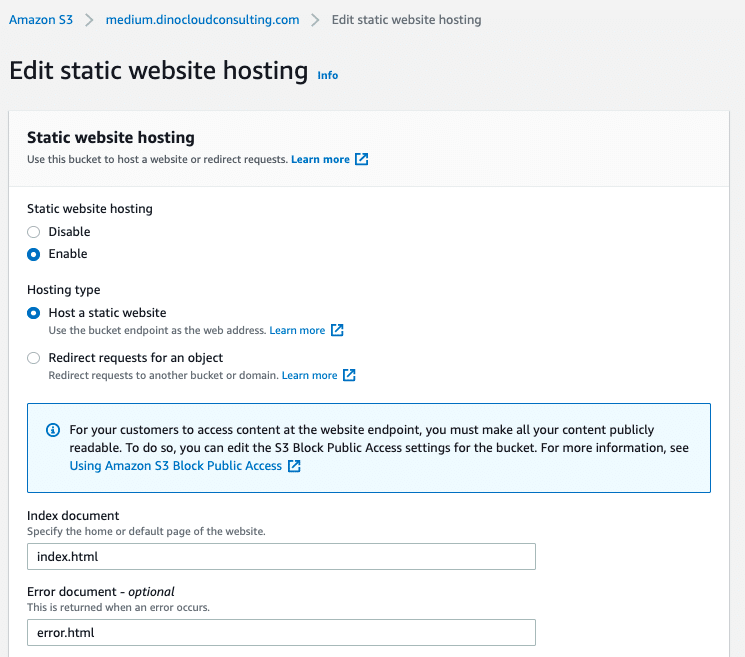
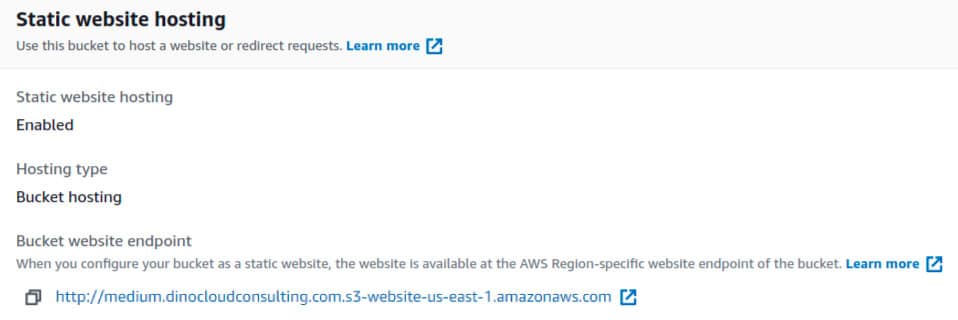
Step 1: S3 Bucket with Static Website Hosting
Sign in to the AWS Management Console and open the Amazon S3 console at AWS S3.
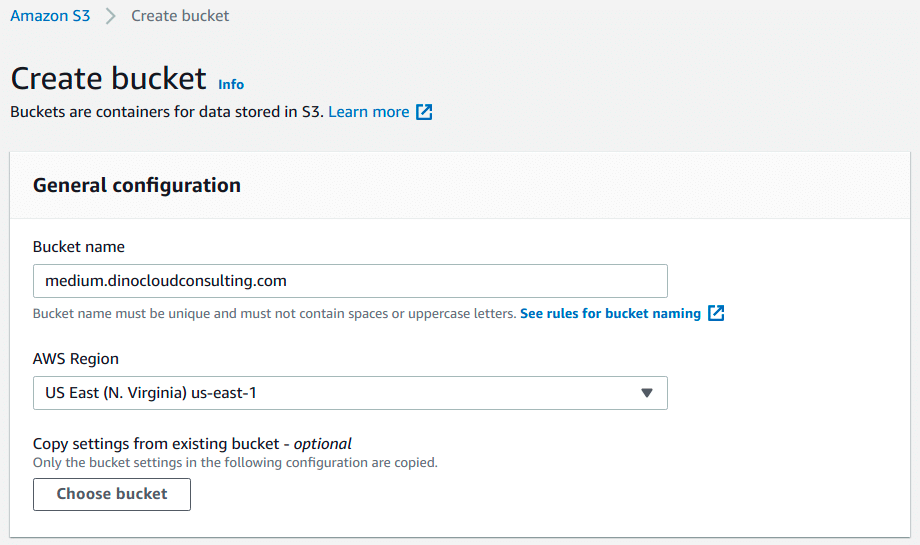
Choose Create Bucket, enter the Bucket Name (for example, medium.dinocloudconsulting.com) and on region select us-east-1 and Create.
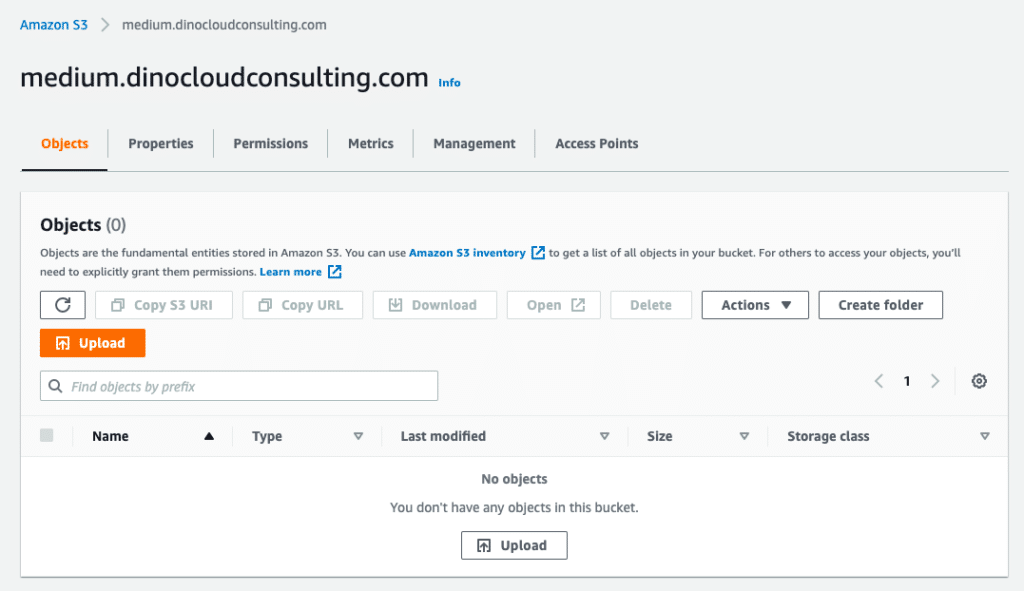
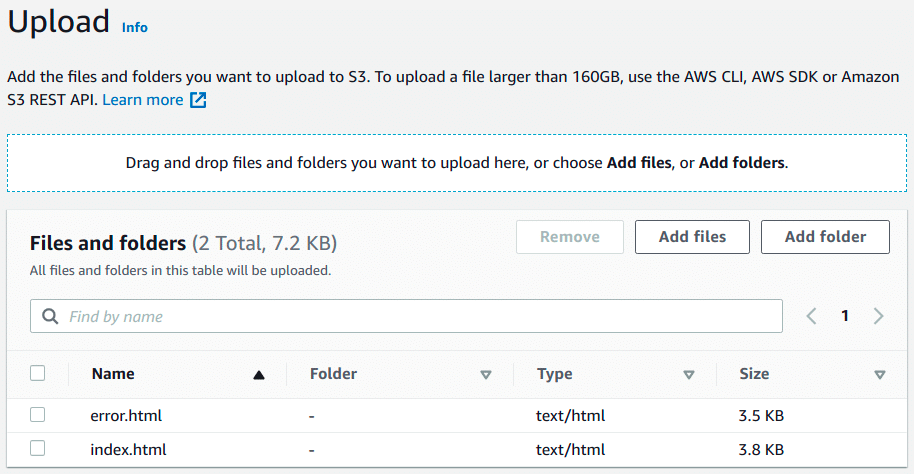
Now you can upload your index.html to the already created bucket.
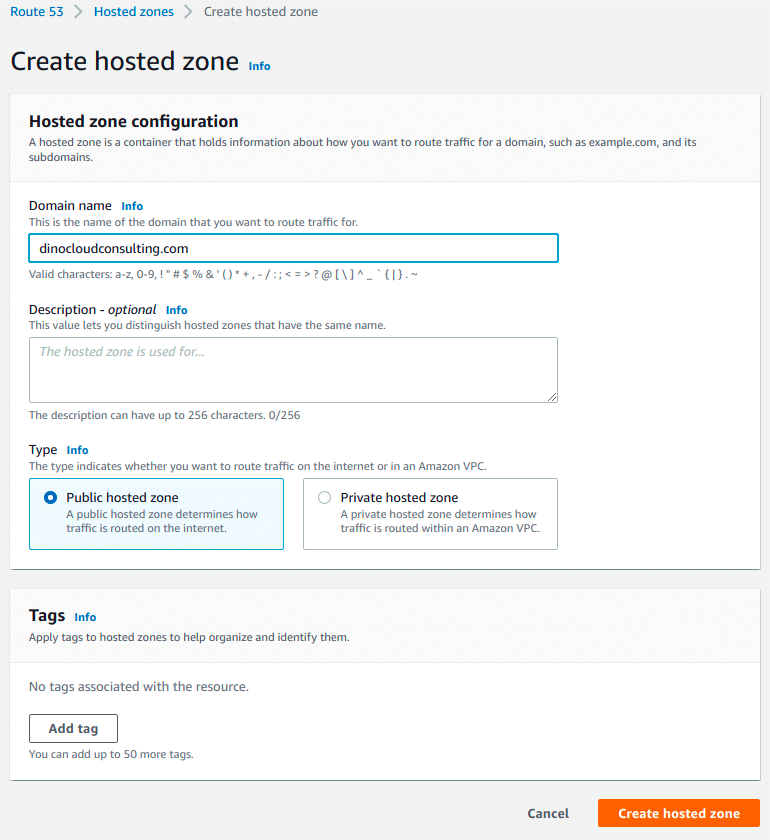
Step 2: Route 53 Create Hosted Zone
Sign in to the AWS Management Console and open the Amazon Route 53 console at AWS Route 53.
Choose Create Hosted Zone, enter the Name, select the Type Public Hosted Zone and Create.
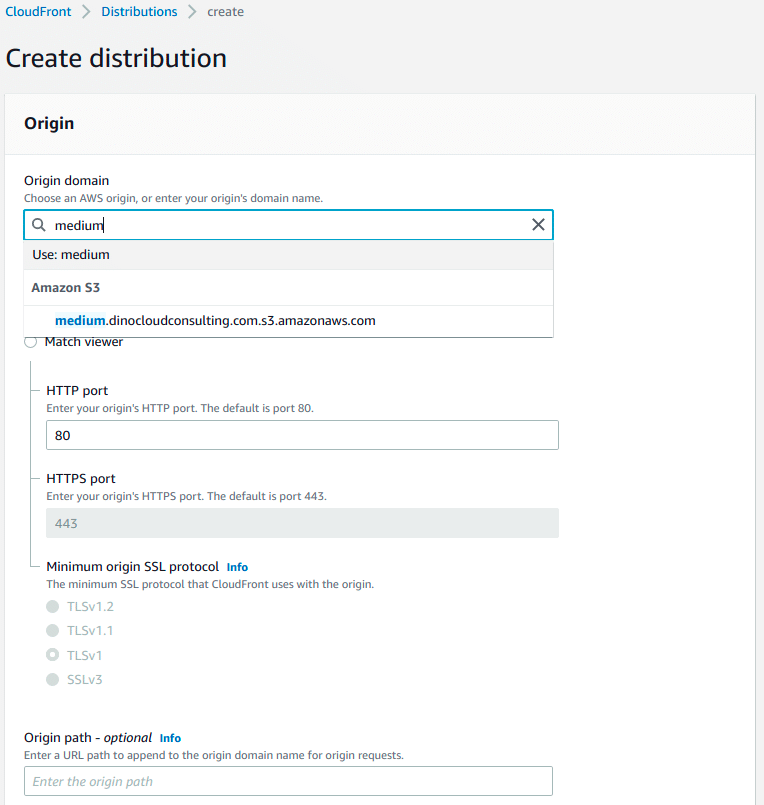
Step 3.1: CloudFront Create and Configure Distribution and OAI.
Sign in to the AWS Management Console and open the Amazon CloudFront console at AWS CloudFront.
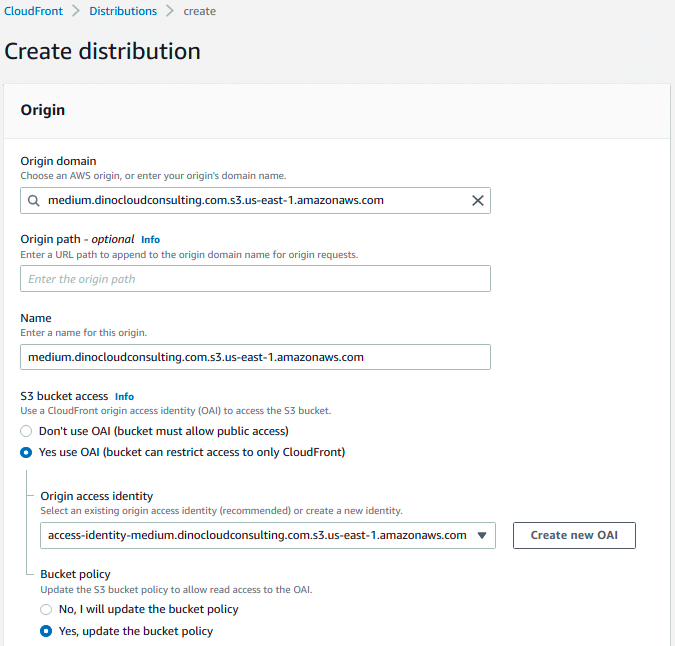
Choose Create Distribution, in the Origin Settings section, for Origin DomainName, enter the Amazon S3 website endpoint for your bucket (for example, medium.dinocloudconsulting.com.s3-website-us-east-1.amazonaws.com)
Under Bucket Access select Yes, use an OAI, Createnew OAI and select Yes, update the bucket policy.
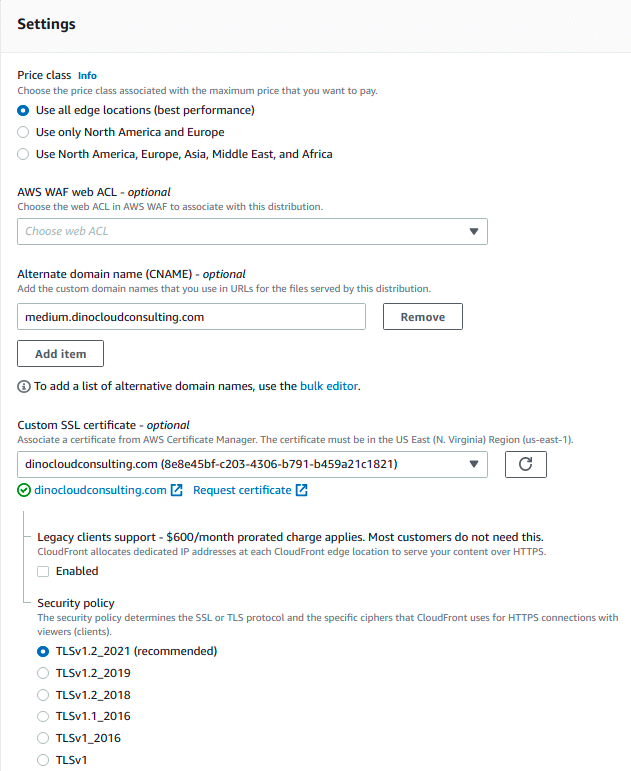
(Optional) For SSL Certificate, choose Custom SSL Certificate (example.com), and choose the custom certificate that covers the domain
Set Alternate Domain Names (CNAMEs) to the root domain. (for example, example.com).
In Default Root Object, enter the name of your index document, for example, index.html.
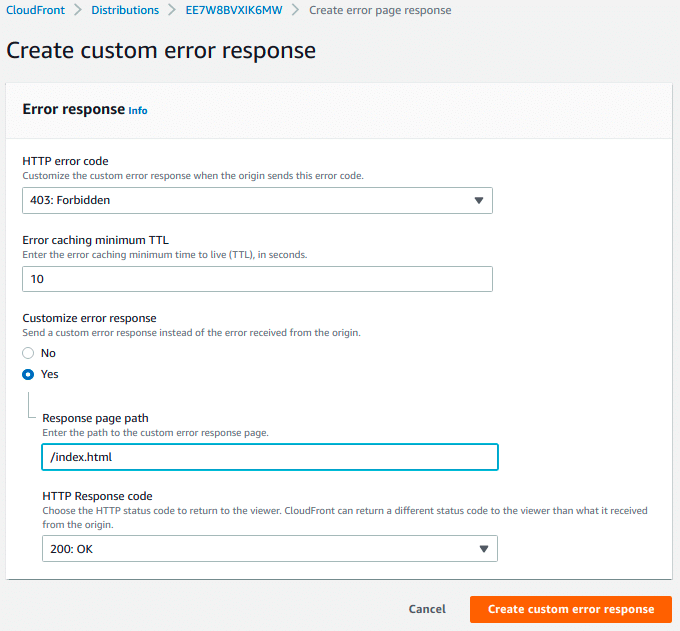
Select the Distribution, already created, and go to the properties tab called Error page.
Set the followings properties:
HTTP error code: 403: Forbidden.
Customize error response: Yes.
Response page path: /index.html
HTTP response code: 200: OK
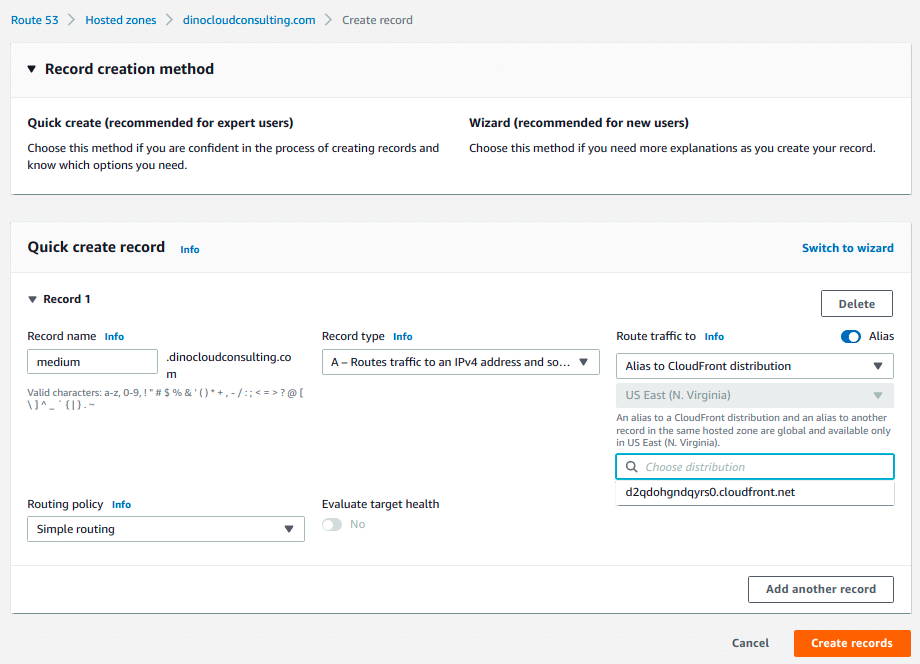
Step 4: Route 53 create a Record.
Sign in to the AWS Management Console and open the Amazon Route 53 console at AWS Route 53.
On the Hosted Zone which you already have created, select Create Record.
Select Record Type: A and under Value field, check Alias and select the CloudFront Distribution domain name.
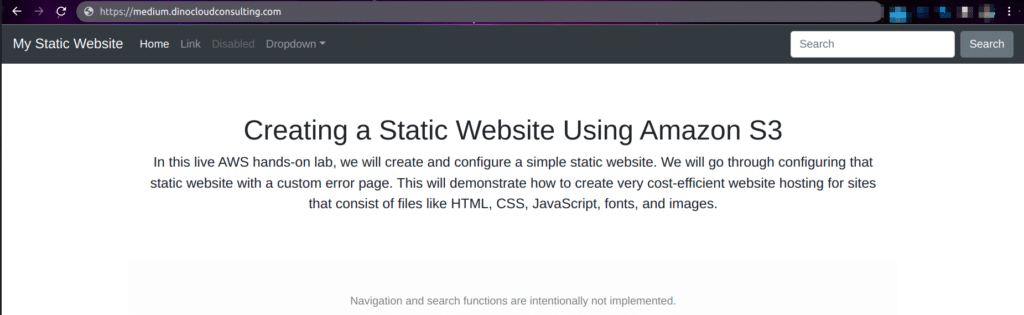
Wait a couple of minutes for the DNS to propagate and search the site on your browser.
All ready! You now have your static website up and running.
At DinoCloud, we take care of turning a company’s current infrastructure into a modern, scalable, high-performance, and low-cost infrastructure capable of meeting your business objectives. If you want more information, optimize how your company organizes and analyzes data, and reduce costs, you can contact us here.